Raspberry Squeezie
Info
Raspberry Squeezie was one of the first tutorials describing how to put a piCorePlayer together. Unfortunately it is no longer available so I found a copy on the WayBack Machine and reproduced it here. I couldn’t find any contact details for the original author so its reproduced without permission. If anyone knows the author please let me know.
Danger
Information is for a very early piCorePlayer.
Overview
Build a minimalist design, high quality Squeeze player for use with a Squeeze Server. This appliance can be useful for people who already have, or plan to have, a Squeeze Server, and want to play their music in additional locations around the house. Until Logitech abandoned the Squeezebox project, people could blow a couple of hundred or a thousand dollars on a Logitech product, such as the Squeeze Touch or the Transporter. Now they are able to build a capable player for much less than a hundred dollars, and learn something at the same time. Construction time: if you are already familiar with RPi and Squeezebox and if everything goes right, no more than fifteen minutes; if you’re a total newbie, allow an hour.
This project builds a headless Squeeze player with a digital audio output via HDMI or USB that can deliver up to 24 bits/192 kHz quality. The RPi also has an analog audio output, which can be useful for testing purposes, but may not meet your standards for serious music listening!
1. Gather the parts
You will need:
- A Raspberry Pi (Rev B or later).
- A Power Supply for the RPi – see Choosing a Power Supply for your RPi.
- A wireless dongle for the RPi (recommended but optional).
- An SDHC card, minimum 2GB, Class 4 or better.
- A box for your Pi.
Tools and other equipment:
- A desktop or laptop computer with ethernet and USB.
- An SD card reader writer, built-in or USB connected.
- An Ethernet cord.
- A DAC – see Choosing a DAC for use with a Raspberry Pi audio player.
- Optional: an HDMI to SPDIF converter if you don’t have a USB DAC and don’t want to use your TV to extract the digital audio signal.
- A Squeezebox Server (Lyrion Media Server) up and running on your LAN.
- Optional: A smartphone or tablet with a Squeeze controller app installed – see comparison of Squeezebox control apps for Android and iOS.
- A copy of the piCorePlayer software for your RPi model.
2. Download the Software
The software used for this project is free, Open Source software. Once your RPi is up and running to your satisfaction, please consider donating to those hard-working software developers. (Links at the end of this page.)
The RPi image we have chosen for this project is piCorePlayer, which includes a version of the highly reliable Squeezelite player. It also includes a cut-down version of linux and a minimalist web server for configuration. All this in one download, which you can get on the piCorePlayer web page. Once you’ve downloaded the image, put it in a folder on your hard drive in which the path has no spaces or weird characters. This will just make things a bit less complicated during the flash process.
Now go to this project page for instructions on how to flash your disk image, then come back here to continue.
3. Connect to piCorePlayer
Set up can be done from your desk. No need to plug it into your audio system yet!
- Optional: Connect a keyboard (USB), mouse (USB) and display (HDMI) to your Pi. This is not strictly necessary, as you will configure the RPi via the web interface, but it will allow you to see what is going on if you’re interested. If you don’t connect a screen, the RPi will quite happily run headlessly.
- Insert your newly flashed SD card into the RPi SD card slot.
- Connect an ethernet cord from the RPi to your LAN/router. If you plan to use wireless then you can insert the USB wireless dongle now, or wait until the basic configuration is completed.
- Plug in the power supply and connect it to the Pi. The RPi will boot. Note the RPi has a tiny processor and booting of PiCorePlayer typically takes a couple of minutes.
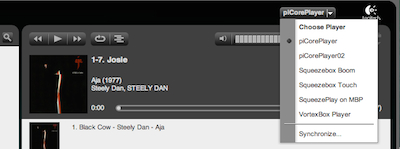
- On your desktop or laptop, use your browser to access your Squeezebox Server interface. Look for the piCorePlayer in the dropdown list at the top right. This confirms that the Player has booted correctly and registered with the Squeezebox Server.
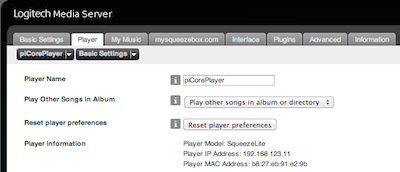
- Now, still in the server browser interface, go to Settings (bottom right), choose the Player tab, and select your new player – by default its name will be piCorePlayer. This will allow you to see the Player’s assigned IP address. In this example, the IP address is 192.168.123.11.
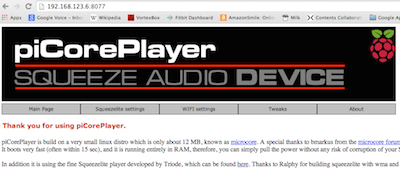
- Now, you’re going to use your web browser to talk directly with the player. Open a new tab in the browser, and enter your Player’s IP address followed by :80. For example: http://192.168.123.11:80 (if you are loading piCorePlayer version 1.16 or earlier use :8077)
- This will take you to the piCorePlayer’s web interface, which looks something like this:
You have now confirmed that your new RPi player is running, connected to the network, and has completed its handshake with the Squeeze server. You can check that you already have a working system in place if you like. Plug a headset into the analog jack on the Pi, go to your server, select the new RPi, and play some music.
The RPi analog output is not likely to impress serious audiophiles, but it’s quite listenable and provides confirmation that all the parts are connected. It’ll get better!
4. Configuring piCorePlayer
Now you’re connected, all basic configuration can be done via the piCorePlayer browser interface. These configuration steps can take place in any order, but the order they’re listed here is a logical progression that allows you to test progress at each stage.
Change the Player’s Name
You’ll probably want to change the Player’s name. You might change it to show the location (‘mediaroom’) or just to differentiate it from other piCorePlayer devices on the network (‘piCorePlayer04’).
In the piCorePlayer browser configuration pages there are two places where you can change the name. One changes the name used by the Squeezebox server, and the other is the name recognized by your LAN router. It’s convenient to have the two names the same, but you can choose two different names if you prefer a more complicated life.
To change the name recognized by the Squeezebox server:
- Choose the [Squeezelite settings] tab in the piCorePlayer browser interface.
- Change the entry in the field [Name of your player].
- Go to the bottom of the page and click [Submit].
- Go to the [Main Page] and click [Restart] to restart the Squeezelite server.
To change the name used on the LAN:
- Choose the [Tweaks] tab in the piCorePlayer browser interface.
- Change the entry in the field [Change the HOST name].
- Click [Submit].
When you’ve made both changes, go to [Main Page] and click [Reboot] to re-register the device with its new names. Wait a couple of minutes until the new name appears on your Squeeze server. Play another track.
Set up Wi-Fi
You can run the RPi either directly wired into your LAN or via WiFi, using a WiFi dongle.
To set up WiFi keep your ethernet cable attached until you’ve successfully configured the wireless settings!
- Select the tab [WiFi Settings].
- Insert the WiFi dongle and wait a few seconds.
- Click [Start WiFi Scan].
- You will see a list of available networks, and this will confirm that your dongle is working.
- Move up the page and enter the network’s SSID (name) ensuring it is exactly the same as the network on the discovery list, and the password.
- Select the appropriate encryption protocol from the dropdown.
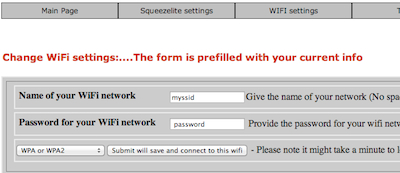
- Now click the [Submit will save …] button. When WiFi is successfully connected, after a minute or so, you can detach the ethernet cord. Give the RPi some time to re-register with the server. If it doesn’t connect, then cycle the power on the RPi to reboot it without the ethernet cable, which will force a new server handshake.
- Once WiFi is working, the IP address may have changed! So to continue with further configuration, check the IP address and reconnect as before.
- Play another track. (Does it sound any better or worse than the wired connection?)
Set the Output Device
The RPi can only drive one output at a time. The default setting when the software is installed is Analog output (the headphone jack) so to use anything else you need to change the settings in the browser interface.
Set the Output Device to HDMI
To enable digital audio out over HDMI, so you can connect to a TV, Surround Sound Processor, or HDMI/SPDIF splitter:
- Choose the [Squeezelite settings] tab.
- Select the button next to HDMI audio.
- Click [Submit].
- Choose the [Main Page] tab.
- Click [Reboot] to load the correct config details, reboot the Pi, and restart Squeezelite.
NOTE: In a standard setup on Pi, HDMI audio-only is limited to 48Hz/16bits. The developer of piCorePlayer (Steen) has tried hard to overcome this built-in limitation with some success, but different versions seem to respond differently. If you want to play audio files at higher definitions (48/24, 88/24, 96/24, 176/24, 192/24) it’s probably better to use a good powered USB DAC or a HiFiBerry Digi to process these higher bitrate files reliably and predictably.
Set the Output Device to USB or I2S
To enable digital out over USB, to connect to a USB DAC or USB/SPDIF converter, or to connect to an I2S device such as a Hifiberry board, then do this:
- Connect and power up your USB DAC, I2S board or converter. Reboot the Pi.
- Wait … for the piCorePlayer to fully reboot then connect to the piCore Player browser interface, as above.
- Select the [Squeezelite settings] tab.
- Select the button for USB audio or the appropriate I2S device (2S-audio DAC).
- Click [Submit].
- Click [Restart] to stop and restart Squeezelite with the new settings.
- Try it! Some DACs and boards work with no further configuration. If it works, fine: stop there and enjoy the music. If not, keep going …
- Further down the page in the [Squeezelite settings tab] click on [List available ALSA devices]. This will give you a list of connected devices. Example:
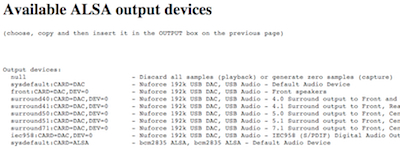
- You can see multiple options for stereo and for various surround sound configuration. For 2-channel stereo the text to be copied is sysdefault:CARD=DAC.
- Select the text, copy it, then go back to the [Squeezelite settings] tab and paste the contents into the field [Output settings].
- Click [Submit].
- Click [Restart] to stop and restart Squeezelite with the new settings.
To Set the Output Device to Analog (Headphone Jack)
To use the Analog output:
- In the piCore Player browser interface, select the [Squeezelite settings] tab.
- Select the button next to Analog Output.
- Click [Submit].
- Click [Restart] to stop and restart Squeezelite with the new settings.
Setup Completed
When everything is working the way you want it, we recommend that you power down the RPi, remove the SD card and lock it. The lock switch is a little slider on the left side of the card. You can’t do this with most applications but piCorePlayer is so compact it can run entirely in RAM, which means that you can secure the card against accidents by locking it.
While you have the card out of the Pi, why not stick a label on the reverse side, away from the connectors, so it can be read when it’s plugged in. A labelling machine can squeeze a lot of info into that small space: player name, distro version number, selected output, and Wifi network. This can prove useful when you find you have six SD cards scattered around your workbench.
Updating the Software
For versions of piCorePlayer before v16, the most reliable way of moving to the latest version is to download the new version and flash the SD card again.
From pcp 1.16 of piCorePlayer it is possible to update the software in place, without reflashing the SD.
- Make sure your SD card is unlocked and reboot the device.
- Access the piCorePlayer web interface. Identify the IP address of the player from your Squeezebox server web interface, then use your browser to go to port 8077. This is the same interface you use for managing your piCorePlayer.
- On the Main page, select the button marked “Update piCorePlayer”.
- When the update is complete, backup the changes, and reboot.